
WordPressの機能でもかなり便利なウィジェット。
簡単に内容を追加削除できるので何かとよく使う。
このテーマでは右メニューしかウィジェットがでないのだけど。
何かと便利に使うため投稿ページ下にも追加したのでメモ。
1.テーマファイルの修正
2.functions.phpの修正
1.テーマファイルを修正する。
テーマファイルの表示したい箇所に、ウィジェットを表示する場所を追加します。
このブログはフリーのテーマ、Codium Extendを使っています。
今回の追加は、各投稿記事の下にランキングサイトバナーを表示できるようにするため。
なので、single.phpのみ追加します。
single.php 40行目付近
</div><!– .post –>
<?php dynamic_sidebar("singlebottom"); ?>
<div id="nav-below" class="navigation">
太字が追加した部分。
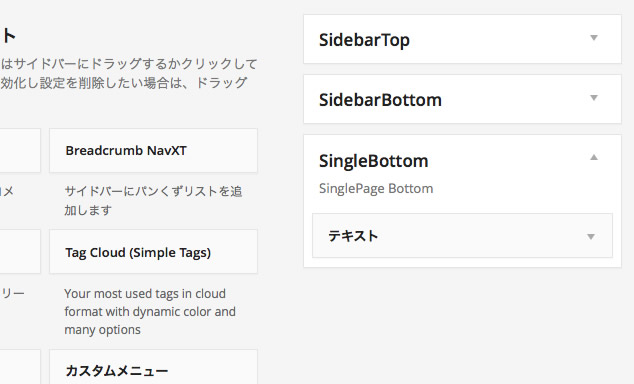
ウィジェットを追加する場合、名前をあらかじめ決める必要がある。
他のウィジェット表示の場所をかぶらなくて、判りやすい名前であればOK。
上では
singlebottom
という名前にしている
2.functions.phpを修正する。
つづいて、
functions.phpの240行目付近に太字の記述を追加。
function codium_extend_widgets_init() {
register_sidebar(array(
‘name’ => ‘SidebarTop’,
‘description’ => ‘Top sidebar’,
‘id’ => ‘sidebartop’,
‘before_widget’ => "\n\t\t\t" . ‘<li id="%1$s" class="widget %2$s"><div class="widgetblock">’,
‘after_widget’ => "\n\t\t\t</div></li>\n",
‘before_title’ => "\n\t\t\t\t". ‘<div class="widgettitleb"><h3 class="widgettitle">’,
‘after_title’ => "</h3></div>\n" .”
));
register_sidebar(array(
‘name’ => ‘SidebarBottom’,
‘description’ => ‘Bottom sidebar’,
‘id’ => ‘sidebarbottom’,
‘before_widget’ => "\n\t\t\t" . ‘<li id="%1$s" class="widget %2$s"><div class="widgetblock">’,
‘after_widget’ => "\n\t\t\t</div></li>\n",
‘before_title’ => "\n\t\t\t\t". ‘<div class="widgettitleb"><h3 class="widgettitle">’,
‘after_title’ => "</h3></div>\n" .”
));
register_sidebar(array(
‘name’ => ‘SingleBottom’,
‘description’ => ‘SinglePage Bottom’,
‘id’ => ‘singlebottom’,
‘before_widget’ => "\n\t\t\t" . ‘<div id="%1$s" class="widget %2$s"><div class="widgetblock">’,
‘after_widget’ => "\n\t\t\t</div></div>\n",
‘before_title’ => "\n\t\t\t\t". ‘<div class="widgettitleb"><h3 class="widgettitle">’,
‘after_title’ => "</h3></div>\n" .”
));
}
singlebottomの部分はテーマで修正した名前と同じにします。
‘name’ => ‘SingleBottom‘,
‘description’ => ‘SinglePage Bottom‘,
‘id’ => ‘singlebottom‘,
‘before_widget’ => "\n\t\t\t" . ‘<div id="%1$s" class="widget %2$s"><div class="widgetblock">’,
‘after_widget’ => "\n\t\t\t</div></div>\n",
‘before_title’ => "\n\t\t\t\t". ‘<div class="widgettitleb"><h3 class="widgettitle">’,
‘after_title’ => "</h3></div>\n" .”
));
name(名前)は、SingleBottom
description(説明)は、SinglePage Bottom
idは、singlebottom
before_widgetなどは、ウィジェットの前に入れるタグなどを記述してあるけど、今回はそのまま。
後で調整するかな。
これで完了。
ダッシュボードにログインし。外観のウィジェットを見ると、以下のように追加されている。
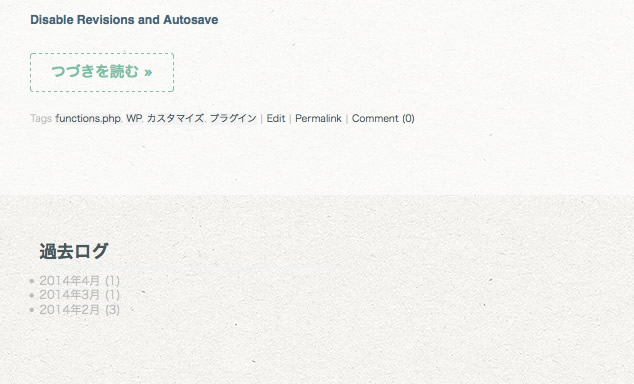
早速ランキングサイトのボタンを書いて保存。
すると、投稿ページにはこんな風に表示されました。
![]()
その後、フッターにも追加してみたけど。
ウィジェット追加し放題ですヨ。